
Welcome to the Egg Incubator User Manual, a comprehensive guide for first-time users. This manual covers setup, optimal conditions, and troubleshooting for successful hatching. Read carefully for safe operation.
1.1. Understanding the Egg Incubator and Its Features
The egg incubator is a device designed to replicate natural incubation conditions for hatching eggs. It features automatic egg turning, temperature control, and humidity management. Advanced models include alarms for temperature and humidity levels, ensuring consistent conditions. The incubator is suitable for various egg types, such as chicken, duck, or quail eggs, and typically holds 9-12 eggs. These features promote optimal development and successful hatching.
1.2. Importance of Reading the Manual Before Use
Reading the manual is crucial for understanding the incubator’s operation, safety guidelines, and troubleshooting tips. It ensures proper setup, optimal temperature, and humidity levels, preventing potential risks. The manual provides essential steps for first-time users and helps avoid common mistakes that could affect hatching success. Always refer to it before starting to ensure safe and effective use of the device.
Initial Setup and Testing of the Egg Incubator
Begin by unpacking and inventorying all components. Connect the power supply and ensure all features function correctly. Test temperature, humidity, and egg-turning mechanisms before use for optimal performance.
2.1. Unpacking and Inventory of Components
Upon receiving your egg incubator, carefully unpack all components. Ensure the box contains the incubator unit, power cord, water tray, egg racks, and user manual. Inspect each item for damage. Familiarize yourself with each part to ensure proper assembly and operation. This step is crucial for a smooth setup process and successful incubation experience.
2.2. Step-by-Step Instructions for Connecting Power and Setting Up
Plug the incubator into a stable power source. Set the temperature to the recommended level (usually 99-100°F for poultry eggs) and allow it to stabilize. Ensure the water tray is filled appropriately for maintaining humidity. Press the reset button to activate the automatic egg turning function. Verify all functions are operational before placing eggs inside. Refer to the manual for specific calibration instructions.
2.3. Testing the Incubator Before First Use
Before first use, ensure the incubator operates correctly. Plug it in, set the temperature, and allow it to run for 24 hours. Check for stable temperature (99-100°F) and proper humidity levels. Verify the automatic egg turning function is working smoothly. Avoid testing during the first 4 days of incubation to maintain consistent conditions for optimal hatching results. Ensure all alarms and sensors are functional.
Maintaining Optimal Conditions for Incubation
Maintain a consistent temperature of 99-100°F and humidity levels between 50-70%. Monitor conditions closely and adjust as needed to ensure proper development. Avoid extreme fluctuations.
3.1. Setting and Calibrating the Temperature
To ensure proper incubation, set the temperature between 99°F and 100°F. Use the control panel to adjust settings precisely. Calibrate sensors by comparing the incubator’s reading with a reliable thermometer. Place the thermometer near the eggs to verify accuracy. Allow the incubator to stabilize for 2-3 hours before adding eggs. Regularly monitor temperature to prevent fluctuations and maintain optimal conditions for embryo development. Ensure accuracy for best results.
3.2. Managing Humidity Levels for Successful Hatching
Maintain humidity levels between 50-60% during incubation. Use the incubator’s water channels to add distilled water as needed. Monitor humidity with a hygrometer. Increase humidity during the hatching period (70-80%). Avoid over-saturation to prevent mold. Regularly check water levels and refill to ensure consistent conditions. Proper humidity ensures healthy embryo development and successful hatching. Adjustments may be necessary based on environmental factors.
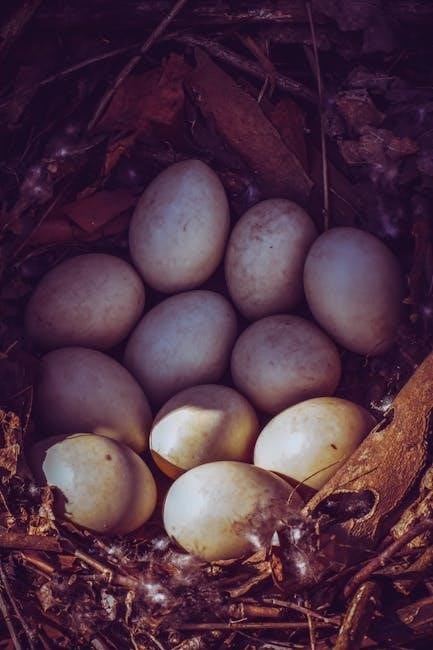
Preparing and Placing Eggs in the Incubator
Select clean, healthy eggs and orient them with the narrower end down. Ensure the incubator is at optimal temperature before placing eggs. Check water levels to maintain humidity. This setup ensures proper incubation conditions and promotes healthy development. Timely adjustments may be needed for optimal results.
4.1. Selecting Healthy Eggs for Incubation
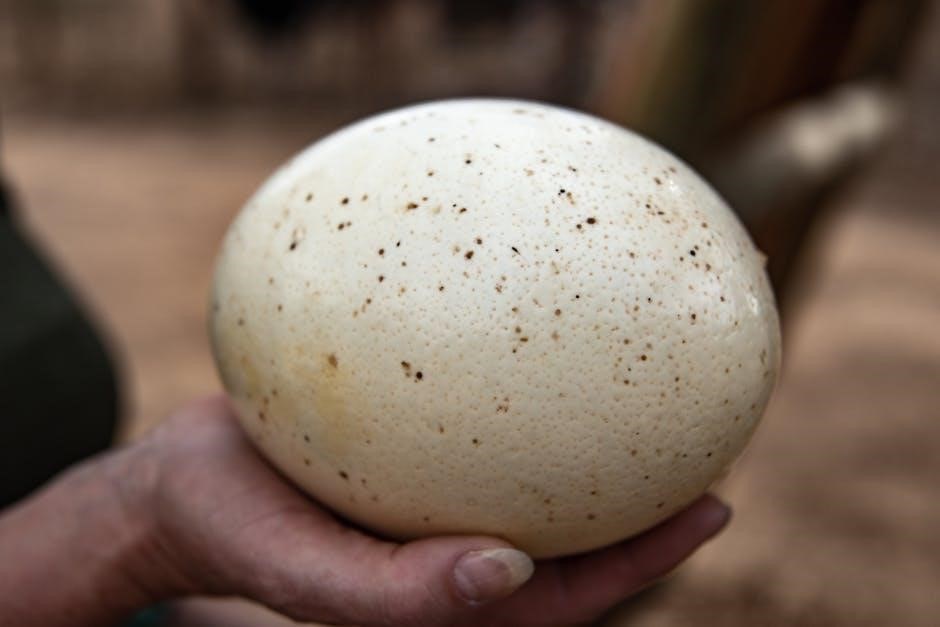
Selecting healthy eggs is crucial for successful incubation. Choose clean, uniform eggs with no cracks or damage. Avoid misshapen or overly large/small eggs. Ensure eggs are fresh, with intact shells and no visible defects. Candling can help identify internal issues. Wash eggs gently if necessary, and store them point-down before incubation. Healthy eggs increase hatching success and minimize risks during the incubation process.
4.2. Correct Placement of Eggs in the Incubator
Place eggs in the incubator with the narrower end facing down. Use the provided egg frame to secure them. Ensure proper spacing for even airflow and humidity distribution. Avoid overcrowding to prevent movement restrictions. Check that the automatic turning function is operational before closing the lid. This setup supports optimal conditions for healthy egg development and minimizes risks during incubation.

The Incubation Process
The incubation process begins with setting the optimal temperature and humidity. Monitor egg development closely, adjusting conditions as needed. Regular candling helps track progress and identify potential issues.
5.1. Understanding the Stages of Incubation
The incubation process involves three distinct stages: initial setup, active growth, and pre-hatching. The first stage ensures eggs are properly placed and conditions are stabilized. The second stage focuses on steady temperature and humidity, promoting embryo development. The final stage prepares for hatching, with increased humidity and minimal disturbance. Monitoring each phase is crucial for successful results.
5.2. Monitoring Egg Development and Adjustments
Regularly monitor egg development through candling to observe growth and viability. Adjust temperature and humidity as needed to maintain optimal conditions. Ensure the incubator’s turning function operates correctly to prevent deformation. Check for signs of development, such as veining and movement. Any abnormalities should prompt immediate adjustments to settings or removal of non-viable eggs for a healthy hatching environment.

The Hatching Period
The hatching period is crucial, lasting 24-48 hours. Monitor for signs like pipping and zipping. Avoid opening the incubator during this time to maintain stable conditions.
6.1. Preparing for Hatching
As hatching approaches, stop automatic egg turning and increase humidity to 70-80%. Ensure water reservoirs are filled. Avoid opening the incubator during this critical phase. Monitor temperature and humidity closely, maintaining stability. Be prepared for chicks to start pipping and zipping. Keep the environment quiet to minimize stress. Follow manual guidelines for optimal hatching success.
6.2. Observing and Assisting During Hatching
Monitor the incubator closely during hatching, observing for pipping and zipping. Avoid opening the incubator unless necessary, as this can disrupt humidity and temperature. If chicks struggle excessively, gentle assistance may be required, but avoid over-intervention. Ensure the incubator remains sealed until all chicks have hatched. Patience is key during this delicate phase to ensure successful and healthy hatching outcomes.
Monitoring and Candling Eggs
Regularly candle eggs to monitor development, checking for cracks, movement, and growth. Use a candler or bright light source to inspect without opening the incubator excessively.
7.1. How to Candle Eggs Safely
To candle eggs, place the incubator in darkness. Use a candler or bright light source, gently holding the egg against it. Inspect for cracks, movement, and growth. Avoid excessive candling to prevent stress. Always handle eggs carefully to prevent damage. Regular candling helps monitor development without disturbing the incubation process. Ensure the light is not too harsh to avoid overheating or stressing the embryos. This simple technique provides crucial insights into the incubation progress, helping identify healthy and unhealthy eggs early on. Proper candling is essential for optimal hatching success. Use a candler specifically designed for egg incubation to ensure safety and effectiveness. Follow all safety guidelines to protect both the eggs and the incubator during the candling process. Regular monitoring ensures any potential issues are addressed promptly. Maintain a consistent schedule for candling to track development accurately. This method is vital for achieving high hatch rates and healthy chicks. Always refer to the incubator’s manual for specific candling instructions tailored to your model. Keep the environment stable during candling to maintain incubation conditions. Candling is a proven method for monitoring egg health and development. By following these steps, you ensure the best possible outcome for your incubating eggs. Safe candling practices are crucial for the success of your hatching process. Remember, candling should be done gently and briefly to avoid any negative impact on the eggs. Proper technique and timing are key to effective candling. This guide provides a clear, step-by-step approach to ensure you candle eggs safely and effectively. Always prioritize the safety and well-being of the eggs during the candling process. Regular candling helps you stay informed about the progress of your incubation. Use this technique consistently to monitor development and make necessary adjustments. Candling is an essential skill for anyone using an egg incubator. By mastering this process, you enhance the chances of successful hatching. Keep in mind that different incubators may have specific recommendations for candling, so consult your manual for model-specific advice. Safe and effective candling ensures the health and viability of your eggs throughout the incubation period; This section provides detailed instructions to help you perform candling safely and effectively. Always follow the guidelines outlined in your incubator’s user manual for the best results. Candling is a simple yet critical step in the incubation process. By adhering to proper techniques, you contribute to the success of your hatching efforts. Regular and safe candling practices are vital for maintaining healthy eggs and achieving high hatch rates. This guide offers practical advice to help you master the art of candling. Remember, the goal is to monitor without disrupting the incubation environment. Safe candling ensures that you can track development without causing stress to the embryos. Proper candling techniques are essential for the well-being of your eggs. Follow the steps outlined here to perform candling effectively and safely. This section is designed to provide you with the knowledge needed to candle eggs confidently. Safe candling is a cornerstone of successful egg incubation. By following these guidelines, you protect your eggs and ensure optimal conditions for hatching. Candling is a valuable tool in monitoring egg health and development. Use it wisely and safely to achieve the best possible outcomes. Always handle eggs with care during candling to prevent any damage. The information provided here is based on best practices derived from various egg incubator user manuals. Safe candling ensures that you can monitor your eggs without compromising their development. Regular candling helps you stay informed and make necessary adjustments. This guide emphasizes the importance of proper technique and timing. By adhering to these principles, you enhance the success of your incubation process. Safe and effective candling is key to achieving high hatch rates and healthy chicks. Always prioritize the safety and well-being of your eggs during this process. Candling is an essential part of incubation management. Use this guide to master the technique and ensure the best possible results. Proper candling practices contribute significantly to the success of your hatching efforts. Remember to stay consistent and gentle when handling the eggs. This section provides everything you need to know to candle eggs safely and effectively. Safe candling ensures that you can monitor your eggs without causing unnecessary stress. By following these steps, you contribute to the health and viability of your eggs. Candling is a simple yet important step in the incubation process. Mastering this technique is crucial for achieving successful hatching outcomes. Always refer to your incubator’s manual for specific instructions, but the principles outlined here provide a solid foundation. Safe and effective candling is within your reach with the right knowledge and practices. This guide is your resource for mastering this essential skill. Keep your eggs safe and healthy by following these candling guidelines. The success of your incubation depends on careful monitoring and proper technique. Safe candling practices are the cornerstone of effective egg incubation. Use this information to enhance your incubation experience and achieve the best possible results. Always handle eggs with care and attention to detail during the candling process. Proper candling ensures that you can monitor development without disrupting the incubation environment. This guide provides you with the tools and knowledge needed to candle eggs safely and effectively. Safe candling is vital for the health and success of your eggs. By following these steps, you ensure that your eggs receive the best possible care during incubation. Remember, candling is about more than just monitoring—it’s about protecting and nurturing your eggs. With the right approach, you can achieve high hatch rates and healthy chicks. This section is your go-to resource for mastering the art of candling. Always prioritize safety and gentleness when handling the eggs. Proper candling techniques are essential for the success of your incubation efforts. Use this guide to ensure that you’re providing the best possible environment for your eggs to develop. Safe and effective candling is a key component of successful egg incubation. By following the guidelines outlined here, you enhance the chances of a successful hatch. Always stay informed and proactive in monitoring your eggs. Candling is a valuable tool in your incubation toolkit. Use it wisely and safely to achieve the best possible outcomes. This guide is designed to empower you with the knowledge needed to candle eggs confidently and effectively. Safe candling practices are crucial for the well-being of your eggs. By adhering to the principles outlined here, you ensure a safe and successful incubation process. Candling is a simple yet critical step that requires attention to detail and proper technique. Follow these guidelines to master the process and achieve optimal results. Always handle eggs gently and monitor their development carefully. Safe candling ensures that you can track progress without causing stress to the embryos. This guide provides a comprehensive approach to candling, helping you to achieve the best possible outcomes for your eggs. Remember, the goal of candling is to monitor without disrupting the incubation process. By following these steps, you can ensure the health and viability of your eggs. Candling is an essential part of incubation management, and with the right techniques, you can perform it safely and effectively. Always refer to your incubator’s manual for specific instructions, but the principles here provide a solid foundation. Safe and effective candling is key to achieving high hatch rates and healthy chicks. By following these guidelines, you protect your eggs and ensure optimal conditions for hatching. Candling is a valuable tool in monitoring egg health and development. Use it wisely and safely to achieve the best possible results. Always prioritize the safety and well-being of your eggs during this process. This section is designed to provide you with the knowledge and skills needed to candle eggs confidently. Safe candling ensures that you can monitor your eggs without compromising their development. Regular candling helps you stay informed and make necessary adjustments. By adhering to these principles, you enhance the success of your incubation efforts. Safe and effective candling is within your reach with the right knowledge and practices. This guide is your resource for mastering this essential skill. Keep your eggs safe and healthy by following these candling guidelines. The success of your incubation depends on careful monitoring and proper technique. Safe candling practices are the cornerstone of effective egg incubation. Use this information to enhance your incubation experience and achieve the best possible results. Always handle eggs with care and attention to detail during the candling process. Proper candling ensures that you can monitor development without disrupting the incubation environment. This guide provides you with the tools and knowledge needed to candle eggs safely and effectively. Safe candling is vital for the health and success of your eggs. By following these steps, you ensure that your eggs receive the best possible care during incubation. Remember, candling is about more than just monitoring—it’s about protecting and nurturing your eggs. With the right approach, you can achieve high hatch rates and healthy chicks. This section is your go-to resource for mastering the art of candling. Always prioritize safety and gentleness when handling the eggs. Proper candling techniques are essential for the success of your incubation efforts. Use this guide to ensure that you’re providing the best possible environment for your eggs to develop. Safe and effective candling is a key component of successful egg incubation. By following the guidelines outlined here, you enhance the chances of a successful hatch. Always stay informed and proactive in monitoring your eggs. Candling is a valuable tool in your incubation toolkit. Use it wisely and safely to achieve the best possible outcomes. This guide is designed to empower you with the knowledge needed to candle eggs confidently and effectively. Safe candling practices are crucial for the well-being of your eggs. By adhering to the principles outlined here, you ensure a safe and successful incubation process. Candling is a simple yet critical step that requires attention to detail and proper technique. Follow these guidelines to master the process and achieve optimal results. Always handle eggs gently and monitor their development carefully. Safe candling ensures that you can track progress without causing stress to the embryos. This guide provides a comprehensive approach to candling, helping you to achieve the best possible outcomes for your eggs. Remember, the
Warranty and Customer Support Information
7.2. Identifying Healthy and Unhealthy Eggs
Healthy eggs during incubation show clear growth and movement when candled. Unhealthy eggs may display cracks, mold, or no development. Candling helps identify viable eggs by revealing development stages. Healthy eggs have visible veins and embryo growth, while unhealthy ones may appear dark or show no activity. Regular monitoring ensures timely removal of non-viable eggs, improving hatch rates and reducing contamination risks. Always prioritize egg health during incubation.